
G’day, we hope this post finds you in a good place.
As we are all aware, children love music. They love to sing and dance to the rhythm of the beat. Hey, we do too :)
We’ve put together some ways to make musical instruments made with recycled materials down below. Check them out!
🎵 Music plays a big role in children’s development as it helps children learn how words are pronounced and read. They also learn to listen and understand the meaning of the words.
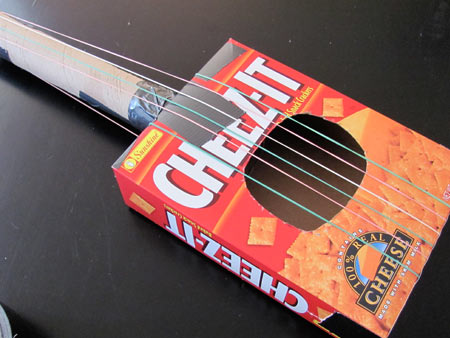
What you need:
Empty cereal box/ tissue box
6 Rubber bands (Tip: Different colours work well!)
Duct tape
Kitchen towel roll
Scissors
Directions:
Cut a hole on the front of the cereal box.
Using rubber bands, tie them on the long side of the cereal box.
Attach the kitchen towel roll in one side of the cereal box using the duct tape to ensure that it sticks.
Have fun and enjoy making music!
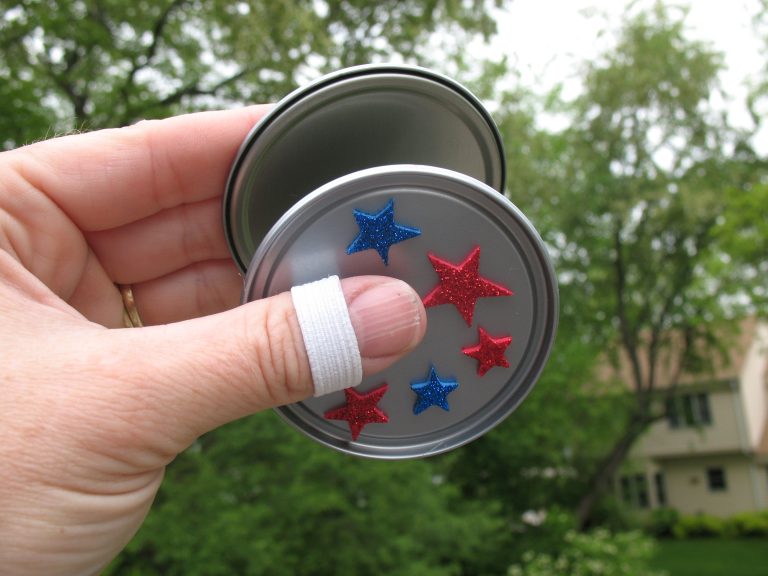
Finger Cymbals
What you need:
2 juice can lids (from frozen concentrate cans)
10” of ½” wide elastic
Scissors
Instant grab glue
Stickers
Directions:
Wrap elastic around the middle and thumb to get a measurement.
Secure those two pieces of elastics with instant grab glue and let them dry.
Secure the elastic finger rings on each of the juice can lid by using the instant grab glue.
Let the glue dry for about 2 hours to ensure that the finger rings will not come off.
Decorate the finger cymbals with stickers.

Maracas
What you need:
Plastic bottle
Toilet paper roll
Electrical tape/ hot glue
Seeds/ beans/ other fillings
Directions:
Clean and dry the plastic bottle.
Fill the bottle with any fillings such as seeds and beans.
Close the cap.
Make a straight cut on the toilet paper roll.
Use electrical tape or hot glue to join the toilet paper roll back together to cover the bottle cap.
Decorate the toilet paper roll.
Kazoo
What you need:
Toilet paper roll
Marker pen
Scissors
Rubber band
Water colour
Wax paper
A bowl
Directions:
Decorate the toilet paper roll with water colours.
Use a marker pen to trace the line of the bowl on the wax paper and cut it out.
Wrap the wax paper around the end of the toilet paper roll.
Secure the wax paper with a rubber band.
Make a hole in the middle of the toilet paper roll.
Function of the hole: for sound to escape with the vibration of wax paper.

Drums
What you need:
Condensed milk can
Balloon
Rubber band
Rice/ sand
Scissors
Chopsticks
Directions:
Put rice or sand into the cans.
Use scissors to cut off the end of the balloon.
Stretch the balloon over the cans and secure it with a rubber band.
Lastly, use chopsticks as "drumsticks" to tap on the balloon.
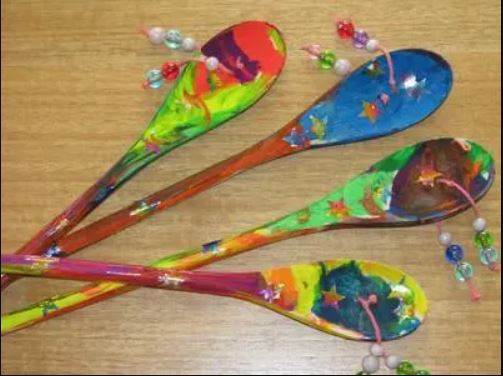
Japanese Pellet Drums With Wooden Spoons
What you need:
Wooden spoons
Drill
Thread or string
Beads
Directions:
Drill two small holes in the middle of the spoon head.
Thread the string through one of the holes and tie a knot.
Thread the beads onto the string and tie another knot at the end.
Cut off any excess string.
Let us end this post on a high note, we hope you have a swell time playing with these instruments!
wow! thanks guys, It is creative and colourful. learns a lot from yours blog.
ReplyDelete